


Prevod izvirnih navodil 43
Übersetzung der Originalbetriebsanleitung 07
Preklad pôvodného návodu na použitie 46
Vertaling van de oorspronkelijke gebruiksaanwijzing 10
Tłumaczenie instrukcji oryginalnej 49
Originalios instrukcijos vertimas 52
Traduction de la notice originale 13
ES
Traducción del manual original 16
Instrukciju tulkojums no oriģinālvalodas 55
Tradução do manual original 19
Algupärase kasutusjuhendi tõlge 58
Traduzione delle istruzioni originali 22
Traducere a instrucţiunilor originale 61
Översättning av bruksanvisning i original 25
Prevedeno s izvornih uputa 64
Alkuperäisten ohjeiden käännös 28
Prevod originalnog uputstva 67
Oversatt fra orginal veiledning 31
Перевод исходных инструкций 70
RU
DA
Oversættelse af den originale brugsanvisning 34
Переклад оригінальних інструкцій 73
Eredeti használati utasítás fordítása 37
Μετάφραση του πρωτοτύπου των οδηγιών χρήσης 76
Překlad püvodního návodu k používání 40
Original instructions 04 · Оригинални упатства 79



European directives.
ADDITIOnAL SAfETy WArnIngS fOr fInISHIng SAnDErS
Thank you for buying this Ferm product. By doing so you now have an excellent product, delivered by one of Europe’s leading suppliers. All products delivered to you by Ferm are manufactured according to the highest standards of performance and safety. As part of our philosophy we also provide an excellent customer service, backed by our comprehensive warranty. We hope you will enjoy using this product for many years to come.
2 Contact with or inhalation of dust coming free during use (e.g. lead-painted surfaces, wood and metal) can endanger your health and the health of bystanders. Always wear appropriate protective equipment, such as a dust mask. Always use proper dust extraction during use.
1 WARNING Read the enclosed safety warnings, the additional safety warnings and the instructions. Failure to follow the safety warnings and the instructions may result in electric shock, fire and/or serious injury. Keep the safety warnings and the instructions for future reference.
The following symbols are used in the user manual or on the product:
1 Read the user manual.
2 Risk of personal injury.
3 Risk of electric shock.
3 Always check that the voltage of the power supply corresponds to the voltage on the rating plate.
4 Immediately remove the mains plug from the mains if the mains cable becomes damaged and during cleaning and maintenance.
5 Wear safety goggles. Wear hearing protection.
Wear a dust mask.
7 Double insulated.
Mains plug replacement (UK only) If the moulded 3-pin plug attached to the unit is damaged and needs replacing, it is important that
Do not dispose of the product in unsuitable containers.
9 The product is in accordance with the applicable safety standards in the
ELECTrICAL SAfETy

- the times when the tool is switched off or when it is running but not actually doing the job, may significantly reduce the exposure level
it is correctly destroyed and replaced by an approved BS 1363/3A fused plug and that the following wiring instructions are followed. The wires in the mains cable are coloured in accordance with the following code: blue neutral brown live
Protect yourself against the effects of vibration by maintaining the tool and its accessories, keeping your hands warm, and organizing your work patterns
As the colours of the wires in the mains cable of the unit may not correspond to the coloured markings identifying the terminals in the plug, proceed as follows: - The wire which is coloured blue must be connected to the terminal which is marked with the letter N or coloured black. - The wire which is coloured brown must be connected to the terminal which is marked with the letter L or coloured red.
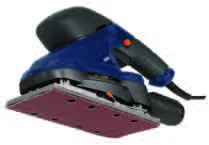
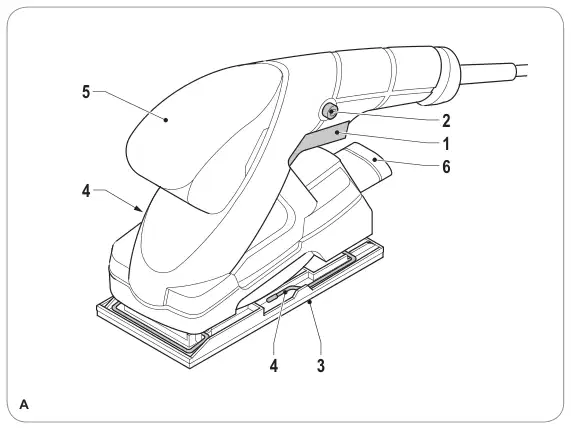
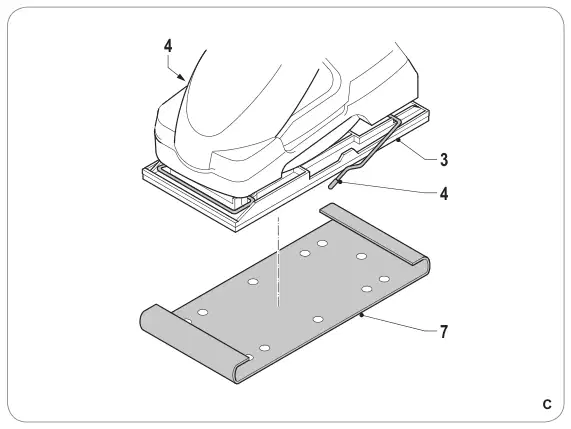
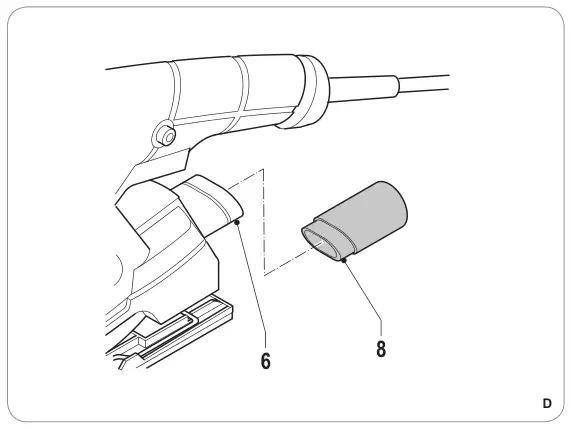
Your finishing sander has been designed for sanding wood, metal, plastics and painted surfaces. 1. On/off switch 2. Lock-on button 3. Sanding pad 4. Sanding paper clamp 5. Grip 6. Dust extraction connection
ASSEMBLy
Mains voltage V~ 230
Mains frequency Hz 50
4 Before assembly, always switch off the machine and remove the mains plug from the mains.
Power input W 180
No-load speed min-1 12,000
Sanding surface mm 187 x 92
Protection class IP 20
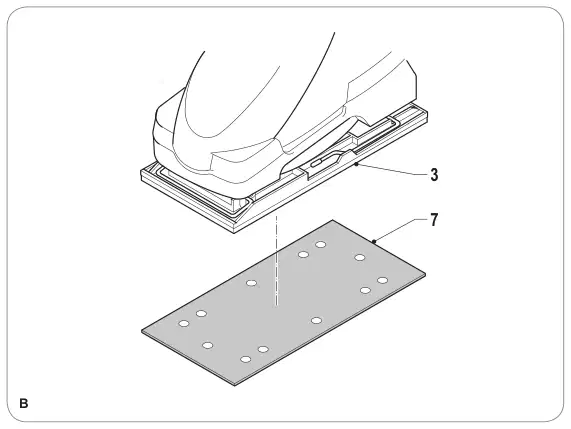
Mounting and removing the sanding paper (hook-and-loop system) (fig. B)
Weight kg 1.42
Mounting ● Mount sanding paper (7) with the required grain size onto the sanding pad (3). Make sure that the perforation in the sanding paper (7) corresponds with the perforation on the sanding pad (3).
Sound pressure (Lpa) dB(A) 76
Acoustic power (Lwa) dB(A) 90
Uncertainty (K) dB(A) 3
Vibration m/s2 6.4
removing ● Remove the sanding paper (7) from the sanding pad (3).
Uncertainty (K) m/s2 1.5
2 Wear hearing protection.
Mounting and removing the sanding paper (sanding paper clamps) (fig. C)
Vibration level The vibration emission level stated in this instruction manual has been measured in accordance with a standardised test given in EN 60745; it may be used to compare one tool with another and as a preliminary assessment of exposure to vibration when using the tool for the applications mentioned
- using the tool for different applications, or with different or poorly maintainted accessories, may significantly increase the exposure level

removing the sanding paper”. ● To mount the new sanding paper (7), proceed as described in the section “Mounting and removing the sanding paper”.
USE
Consult the enclosed warranty terms.
The product, the accessories, and the packaging must be sorted for environmentally friendly recycling.
Only for EC countries Do not dispose of power tools into domestic waste. According to the European Guideline 2012/19/EU for Waste Electrical and Electronic Equipment and its implementation into national right, power tools that are no longer usable must be collected separately and disposed of in an environmentally friendly way.
The product and the user manual are subject to change. Specifications can be changed without further notice.
4 Before cleaning and maintenance, always switch off the machine and remove the mains plug from the mains.
replacing the sanding paper (fig. B) ● To remove the old sanding paper (7), proceed as described in the section “Mounting and
Disposal
この取扱説明書で参照されているリンク(メーカー、サポート、ダウンロード等)。
ユーザーまたはスタッフが通常1日以内に回答します。あなたの質問が次の人の助けにもなります。
最初の質問を投稿しましょう。他のユーザーや当チームが回答します。